exFAT IP for SATA Demo Instruction
Rev1.2 5-Jul-23
This document describes the instruction to run exFAT IP for SATA demo on FPGA development board by using AB09-FMCRAID board. The demo is designed to write and verify data with SATA-II or SATA-III device. User controls the test operation through Serial console.
1 Environment Setup
To run the demo on FPGA development board, please prepare following environment.
1) FPGA Development board: ZC706
2) PC installing Xilinx programmer software (Vivado) and Serial console software such as HyperTerminal and TeraTerm
3) AB09-FMCRAID board provided by Design Gateway
4) SATA-II or SATA-III device connecting to AB09 board
5) Xilinx Power adapter for FPGA board
6) ATX power supply for SATA device
7) micro USB cable for programming FPGA, connecting between FPGA board and PC
8) mini USB cable for Serial console, connecting between FPGA board and PC
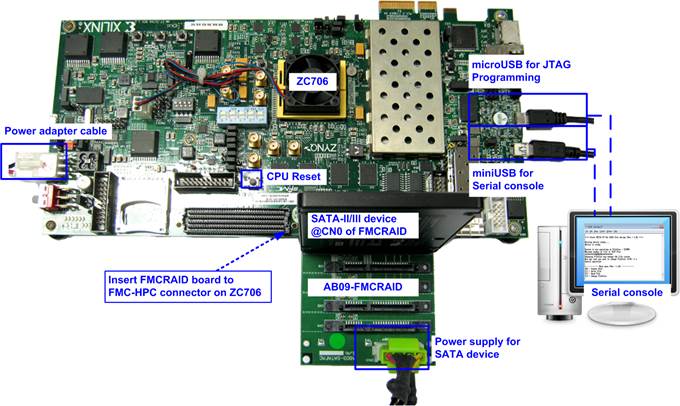
Figure 1‑1 exFAT IP for SATA demo environment setup on ZC706
2 Demo setup
1) Power off system.
2) Set up board option for ZC706 board as shown in Figure 2‑1.
i. Set SW11 =�00000� to configure PS from JTAG
ii. Set SW4=�01� to connect JTAG with USB-to-JTAG interface
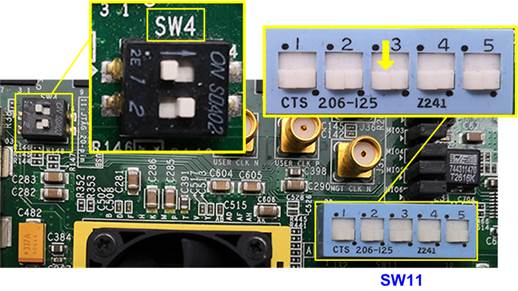
Figure 2‑1 SW setting on ZC706 board
3) Connect the SATA-II/III device on AB09 and then connect AB09 to FPGA board as shown in Figure 2‑2.
i. Connect AB09-FMCRAID board to FMC-HPC connector on FPGA board.
ii. Connect SATA-II/III device to CN0 on FMCRAID board.
iii. Connect ATX power to power connector on FMCRAID board.
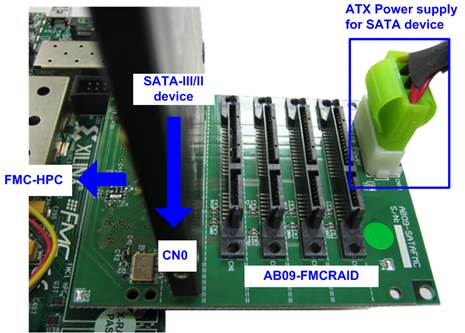
Figure 2‑2 AB09-FMCRAID connection
4) Connect micro USB cable between FPGA board and PC for JTAG programming and connect mini USB cable between FPGA board and PC for Serial console.
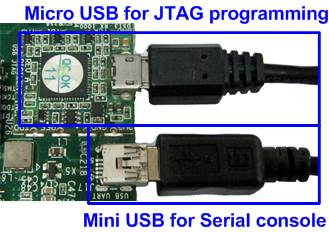
Figure 2‑3 USB cable connection
5) Power on FPGA board and power supply for SATA device.
6) Open Serial console such as TeraTerm and HyperTerminal. Set Baud rate=115,200 Data=8 bit Non-Parity Stop=1.
7) Open Vivado TCL shell and change directory to download or directory that batch file is located. Next, type exFATSataTest_ZC706.bat, as shown in Figure 2‑4.

Figure 2‑4 Command script for download demo file to ZC706 on Vivado TCL Shell
8) Check LED status on FPGA board. The description of LED is as follows.
Table 1 LED Definition
|
GPIO LED |
ON |
OFF |
|
0 |
Normal operation |
System is in reset condition |
|
R |
System is busy |
Idle status |
|
C |
IP Error is detected |
Normal operation |
|
L |
Data verification fail |
Normal operation |
9) After programming completely, LED[0] and LED[R] are ON during running initialization process. LED[R] changes to OFF after finishing initialization.

Figure 2‑5 LED status
10) On Serial console, the message is displayed to show current status as follows.
- �Waiting IP initialization� is displayed during initialization sequence.
- �IP initialization complete� is displayed when IP is idle.
- Before running the test, �The disk must be formatted by exFAT-IP� is displayed. User input �y� to format the disk when the disk is the new disk which has never been formatted by exFAT-IP. After running Format command, all data in the disk are deleted. The example to run Format command is shown in Figure 2‑7 while the example to skip Format command is shown in Figure 2‑8.
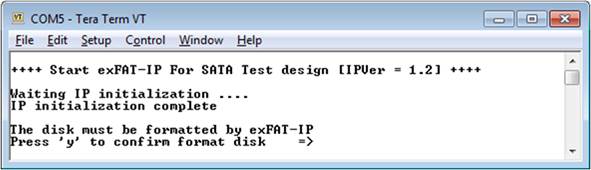
Figure 2‑6 Message when IP runs initialization process
The operation after selecting format disk is same as topic 3.1. Please see more details in that topic. After finishing Format operation or Format is skipped, the system information in the disk are displayed, i.e. current file size, maximum file in the disk, maximum file per directory, and total file in the disk. If the disk is not empty, total file in the disk will not be equal to 0. User can continue to write new file by using same file size. Also, Read file command could be used to verify the data in the disk.
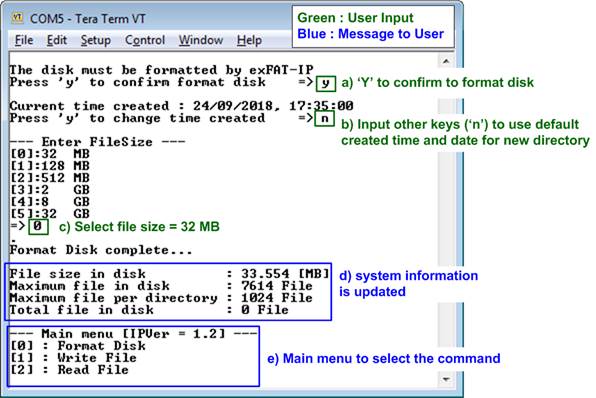
Figure 2‑7 Initialization with format operation
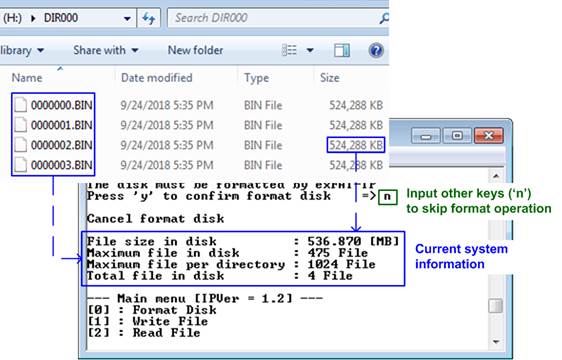
Figure 2‑8 Initialization without format operation
3 Test Menu
3.1 Format Disk
Select �0� to send Format disk command to exFAT IP. The step to run Format command is as follows.
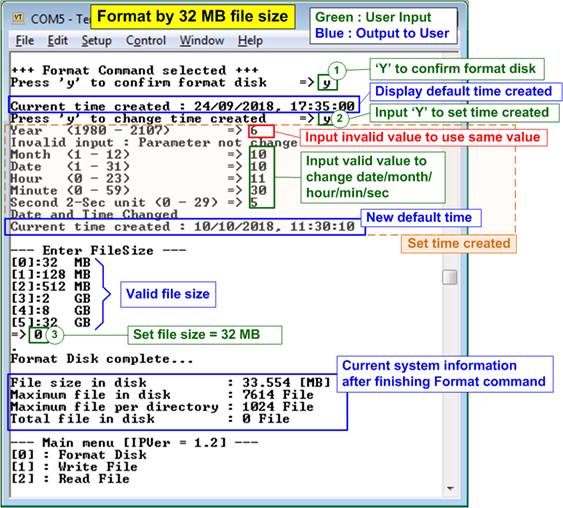
Figure 3‑1 Format Disk menu when updating the created time
1) Input �y� to confirm Format operation or input other keys to cancel the operation. When Format is run, the default value of created date and time will be displayed. This value is applied to be created date and time of empty directories.
2) Input �y� to change created date and time or input other keys to use the default value. There are six parameters to set created date and time for empty directories, i.e.
a) Year �Year of created date. Valid range is 1980 � 2107.
b) Month � Month of created date. Valid range is 1 � 12.
c) Date � Date of created date. Valid range is 1 � 31.
d) Hour �Hour of created time. Valid range is 0 � 23.
e) Minute � Minute of created time. Valid range is 0 � 59.
f) Second � x2 second of created time. Valid range is 0 � 29.
The input is received as decimal unit. User adds �0x� to be a prefix when the input is hexadecimal unit. If the input is invalid, the parameter will not change by using old value. Only the parameter which is in the valid range is updated. Otherwise, the old value is applied.
As shown in Figure 3‑1, year parameter is invalid, so the old value (2018) is applied. Month, date, hour, minute, and second are valid, so these parameters are applied to be the new default value. After that, �Date and Time changed� and the new created time and date are displayed on the console.
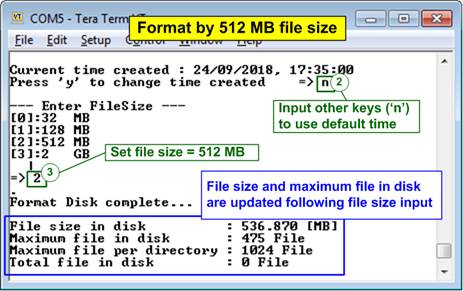
Figure 3‑2 Format Disk menu when using the default created time
Figure 3‑2 shows the example when running Format command without updating created time.
3) Input file size of the disk. The console lists the valid file size of the disk. After receiving file size from user, the IP starts Format operation.
�Format Disk complete� and the updated system information are displayed after finishing Format command.
Figure 3‑1 and Figure 3‑2 sets the different file size based on the same disk capacity. Maximum file in the disk is reduced when file size is increased.
If file size is invalid, the operation will be cancelled, as shown in Figure 3‑3.
Note: Default created time after system boot up is 24 Sep 2018, 17:35:00. When user sets the new created time in Format menu or Write file menu, the new value is applied to be the new default value.

Figure 3‑3 Result from Format Disk menu when file size is invalid
When the disk formatted by exFAT IP is connected to PC, DG_exFAT drive is detected with 512 empty directories (DIR000<1st directory> - DIR1FF<512th directory>). Modified date of the empty directories is equal to the created date setting in the test.
Note: When connecting disk to PC, please do not create, write, or modify data in the disk. If the disk has some modification, the disk must be formatted by exFAT IP.
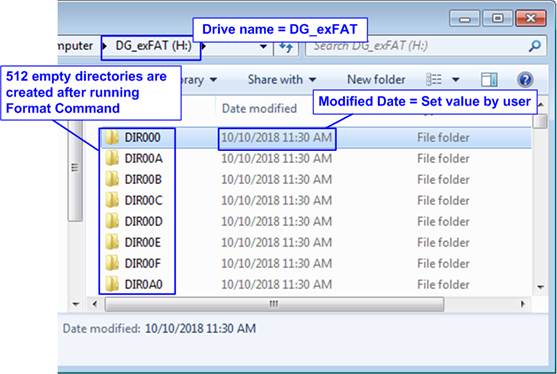
Figure 3‑4 512 Empty directories after Format Disk command completes
3.2 Write File
Select �1� to send Write file command to exFAT IP. The step to run Write file command is as follows.
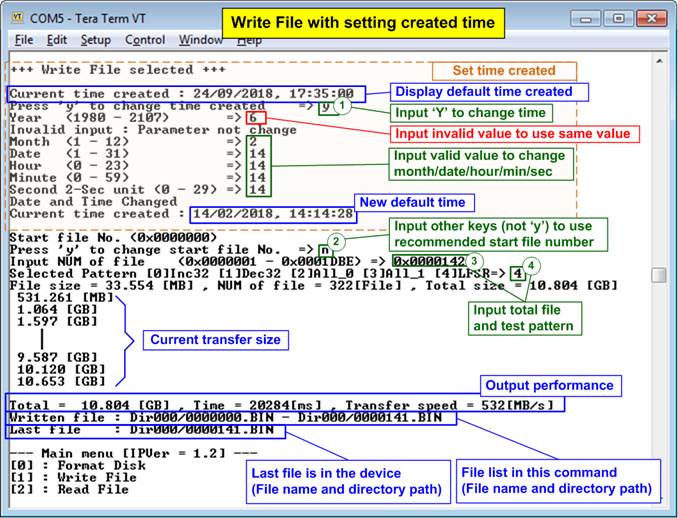
Figure 3‑5 Result from Write File menu with setting time created
1) Similar to Format command, input �y� to change created date and time or input other keys to use the default value. There are six parameters to set created date and time for the new file, i.e.
a) Year �Year of created date. Valid range is 1980 � 2107.
b) Month � Month of created date. Valid range is 1 � 12.
c) Date � Date of created date. Valid range is 1 � 31.
d) Hour �Hour of created time. Valid range is 0 � 23.
e) Minute � Minute of created time. Valid range is 0 � 59.
f) Second � x2 Second of created time. Valid range is 0 � 29.
The input is received as decimal unit. User adds �0x� to be a prefix when the input is hexadecimal unit. If the input is invalid, the parameter will not change by using old value. Only the parameter which is in the valid range is updated. Otherwise, the old value is applied.
As shown in Figure 3‑5, year parameter is invalid, so the old value (2018) is applied. Month, date, hour, minute, and second are valid, so these parameters are applied to be the new default value. After that, �Date and Time changed� and the new created time and date are displayed on the console.
2) Input other keys (not �y�) to use the recommended start file no. The console displays the recommended value which is the next value from the latest write file.
Note: Input �y� to change start file no. is applied to replace the old file. After running, the data in the old file is replaced by the new write file command.
3) Input NUM of file � Input total files to transfer in this command. After complete write file operation, Filename <Start file No>.BIN - Filename <Start file No + NUM of file - 1>.BIN are stored in the device. The input is decimal unit when input only digit number. User can add �0x� to be prefix when the input is hexadecimal unit.
4) Input test pattern � Select pattern of test data in the file. Five patterns can be set, i.e. 32 bit increment, 32 bit decrement, all 0, all 1, and 32 bit LFSR counter.
If all inputs are valid, total data size (calculated by file size x Num of file) will be displayed on the console. Next, Write file command is operated. During writing file, current transfer size is displayed on the console every second to show that system is still alive. Finally, total size, total time usage, and test speed are displayed on the console as test result.
One directory limits the number of files to store, so the new files may store in the different directory. After finishing Write file command, the console lists the file which has just written on the console with the directory path (calculated by <file name>/<maximum files per directory>). Finally, the console displays the last available file in the disk.
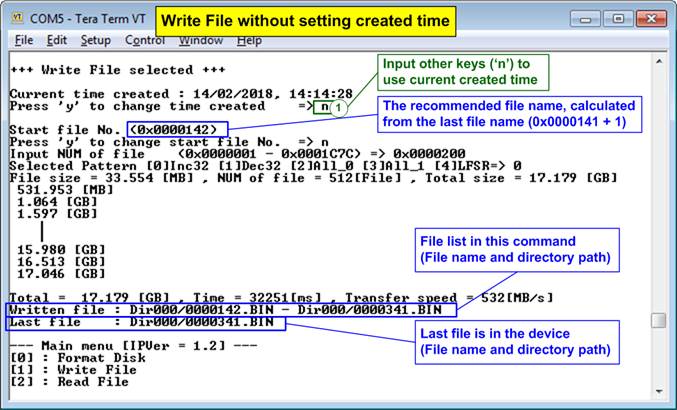
Figure 3‑6 Result from Write File by using current created time
Figure 3‑6 shows the example to Write File by using current created time. �Start file No� of this test is updated from the previous write test. The previous write test in Figure 3‑5 writes file �0000000.BIN� � �0000141.BIN�, so the recommended �Start file No� is 0x0000142 (0x0000141 + 1). After finishing the operation, 512 new files (0x0000142.BIN � 0x0000341.BIN) are created. Now the last file in the disk is updated to be 0x0000341.BIN.
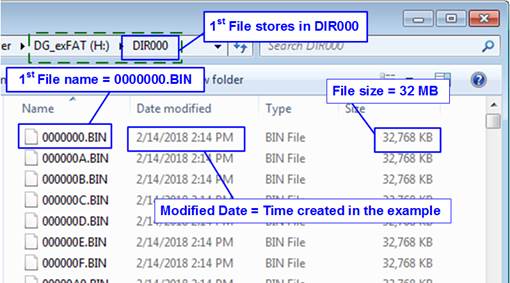
Figure 3‑7 Example test files written by Write File command
When plug the device to PC, the new files are found in the directory. The 1st file in the disk is 0000000.BIN (stored in DIR000). File size and modified date of the new file are equal to the created date and created time setting in Write File test.
Note: When connecting disk to PC, please do not create, write, or modify data in the disk. If the disk has some modification, the disk must be formatted by exFAT IP.
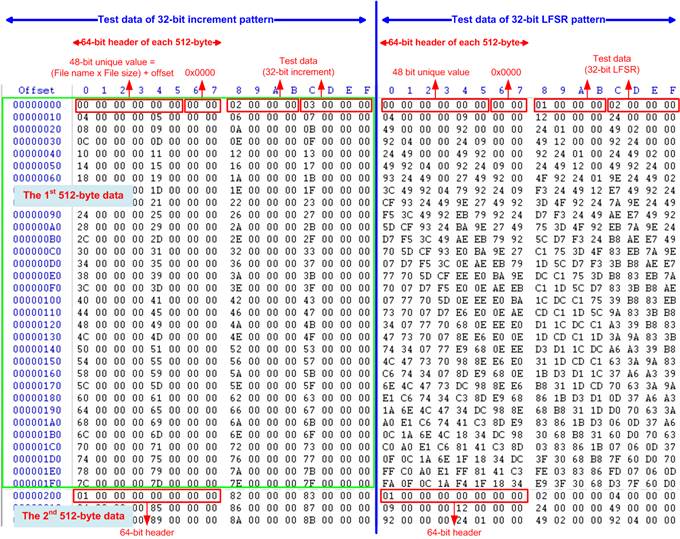
Figure 3‑8 Test data in sector#0 - #1 of file �0000000.BIN� by increment/LFSR pattern
Test data is split into 512 byte unit. Each 512 byte data has the different 64 bit header which consists of 48 bit address (calculated by <file name x file size> + offset in the file) and 16 bit zero value. 48 bit address is the unique value for each 512 byte data. The data after 64 bit header is the test pattern which is selected by user. The example data in file �0000000.BIN� when writing data by increment pattern is in the left window of Figure 3‑8. The right window of Figure 3‑8 shows the example when test pattern is LFSR pattern. The header is same for every test pattern, but the test data (starting from byte#8) depends on the test pattern.
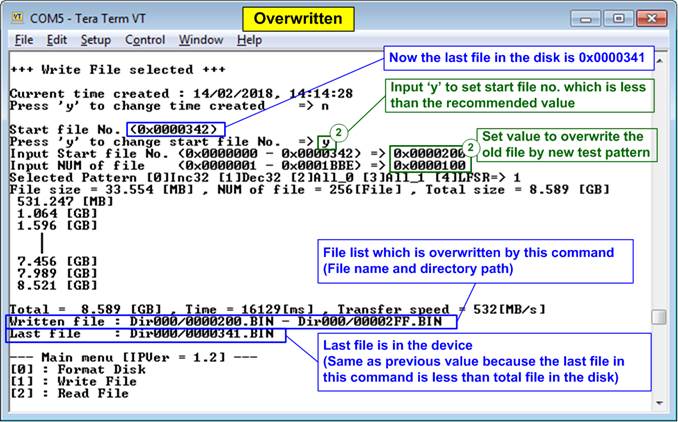
Figure 3‑9 Set new start file no.
Figure 3‑9 shows the example of the overwritten case by setting Start file No. to be less than the default value. The last file in the disk is 0x0000341, but the new command is sent to write 0x0000200.BIN � 0x00002FF.BIN by using decrement pattern (In Figure 3‑6, 0x0000142.BIN � 0x0000341.BIN are created by using increment pattern).
After finishing the operation, the data in 0x0000200.BIN � 0x00002FF.BIN is replaced by the decrement pattern. Because the last file in the new command (0x00002FF.BIN) is less than the last file which is available in the device (0x0000341.BIN), the last file is not updated.
When the last file in the new write file command is more than the previous value, the last file will be updated by the new value.
Figure 3‑10 shows the example of error messages when the input is less than or more than the recommended range for each parameter. �Invalid input� message is displayed on the console and then returns to main menu.
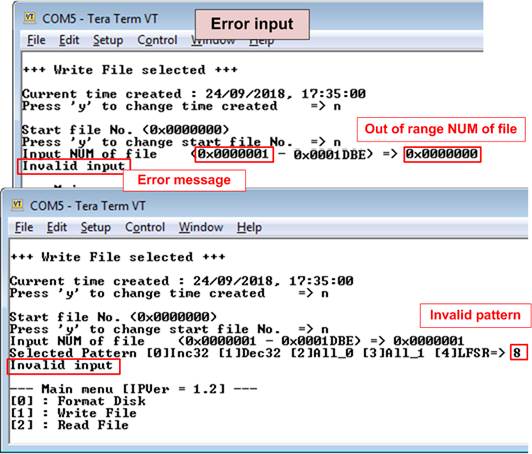
Figure 3‑10 Error message from the invalid input
3.3 Read File
Select �2� to send Read file command to exFAT IP. The step to run Read File command is as follows.
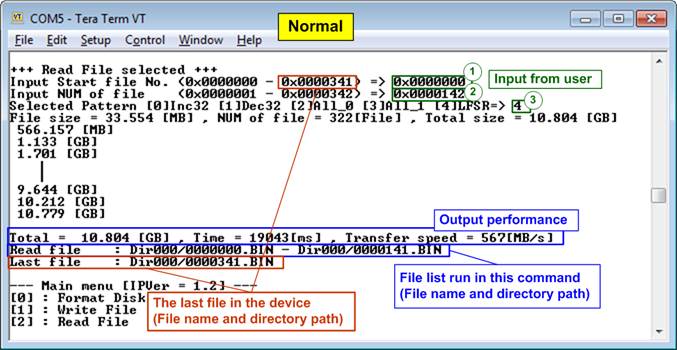
Figure 3‑11 Read File menu when verification is successful
1) Input Start file No � Input the 1st file name to read. The input is decimal unit when input only digit number. User can add �0x� to be prefix when the input is hexadecimal unit. The maximum value is equal to <total file in the disk � 1>.
2) Input NUM of file � Input total files to transfer in this command. The input is decimal unit when input only digit number. User adds �0x� to be prefix when the input is hexadecimal unit. The maximum value is equal to <total file in the disk � Start file No. input>.
3) Input test pattern � Select pattern to verify data in the file. Test pattern must be matched with the test pattern using in Write File menu. Five patterns can be set, i.e. 32 bit increment, 32 bit decrement, all 0, all 1, and 32 bit LFSR counter.
If �Start file No.�, �NUM of file�, and �Select pattern� are valid, total data size (calculated by File size x NUM of file) will be displayed on the console. Read file command is run.
During reading file, current transfer size is displayed on the console every second to show that system is still alive. Finally, total size, total time usage, and test speed are displayed on the console as test result.
When input is out-of-range, �Invalid input� is displayed with operation cancelled.
Similar to write file menu, the console lists all read files of the latest command and shows the last available file in the disk. The last file in the disk is not updated by Read file menu. The value is still same as the upper range to input Start File No. of Read file command.
Figure 3‑12 and Figure 3‑13 show the example of error message when data verification is failed. �Verify fail� is displayed with the first file name which has error, the error address of a file, the expected data, and the read data. User presses any key to cancel read operation or waits until the read process is completed.
If the user waits until read command completing, the output performance from the read process will be displayed. The user can continue to run the system test if the error is caused from wrong test pattern input.
If the user cancels the read operation, the command will not complete in the good sequence. It is recommended to power-off/on SATA device and press �RESET� button to restart system.
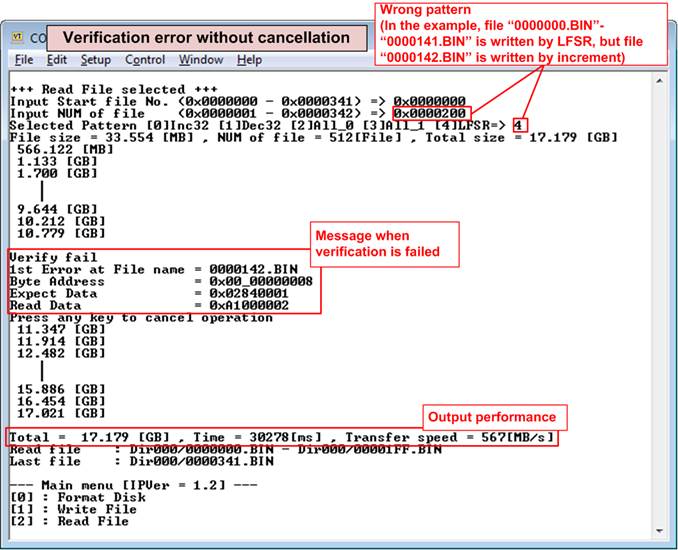
Figure 3‑12 Data verification is failed but wait until read complete
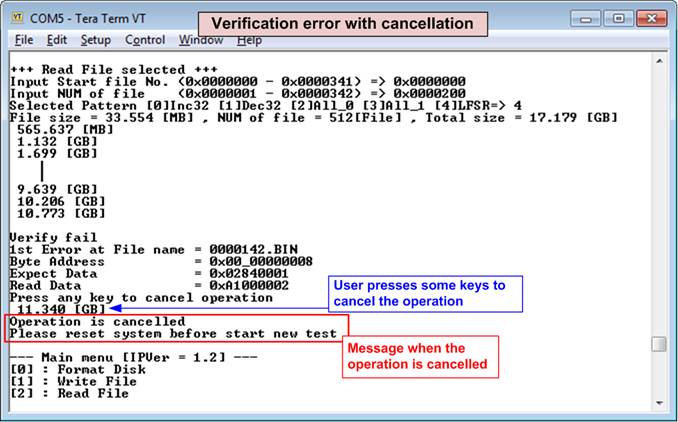
Figure 3‑13 Data verification is failed and press any key to cancel operation
4 Revision History
|
Revision |
Date |
Description |
|
1.0 |
22-Nov-18 |
Initial version release |
|
1.1 |
20-Mar-19 |
Add file size and total file information |
|
1.2 |
15-May-19 |
Correct directory name and update overwritten feature |